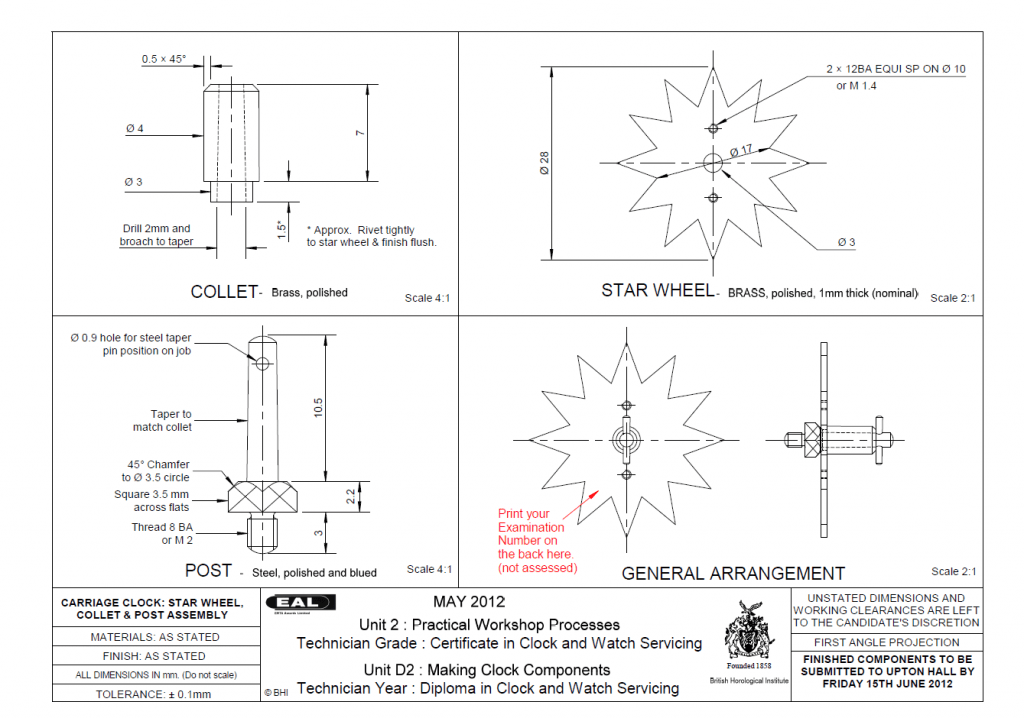
Every year 1st year BHI students are asked to make a clock component. It’s a two week exam, and has a reputation for being very stressful, difficult and harshly marked.
The exam is different each year, although the main areas being tested remain the same:
- Make a post
- A collet
- A wheel or lever that fits on the post
- Working with both Brass and Steel
- Hardening and tempering steel
- Bluing steel
- Polishing
- Riveting
- Filing a square
- Making a screw thread
- Drilling
My first thoughts when receiving this exam drawing through email was; ouch.
After looking at some past papers, we’d seen a circular uncut wheel (basically just a disc) and straight posts. The wheel for this exam was a star shape, and to be honest I thought it looked impossible to make.
The post has a slight taper on it, meaning that it’s fatter at the bottom than the top. This has to match the collet, as the post slides inside the collet, and the collet, which will be riveted to the wheel will need to spin on the post.

There were 4 parts we needed to make:
- Post
- Collet
- Star Wheel
- Taper Pin
The taper pin and collet would be relatively easy to make, and the post and the star wheel would be considerably more difficult. I made a decision early on, that because each previous exam paper had a similar post, and some had a much easier wheel, then the marking system that would be used would probably be heavily weighted towards the post i.e. the post would have the most marks available.
That meant that although the star wheel was going to be difficult to make, I thought that the difficulty would not be relative to the potential marks it would attract.
It’s very important to make such decisions, as although we were given 2 weeks to make the piece, you probably would need 2 months to do everything to your complete satisfaction. So this forms an important part of your exam time keeping.
Conversely I determined that although the collet would be easy to make, as it forms a very important part of the working, it would likely attract quite a few marks. In addition to the parts we had to make there would be some extra areas we’d be marked on:
- Riveting
- Function of the piece
Function is a difficult one, as it’s linked to all the other parts. I would guess that if you submitted an exam piece that really didn’t work at all, then you’re almost guaranteed to fail; as although your individual parts may be ok, the whole point of the exam is to make a working component. But I still figured that you could be assessed on how well the component functioned – how freely it moved and how much shake there was etc.
Before you start doing anything at all, you need to seriously consider all the parts, how they interact with each other, the fine details and the order you’re going to make the parts – and the order of each detail in each part.
As I mentioned, when I first looked at the project I thought it was going to be impossible to get right. But once you start dividing it down into steps, you realise that maybe, just maybe, it might be possible.
Clearly the two most difficult parts are the wheel and the post. I thought the Star Wheel would take the most time, and so that’s what I decided to start with.
I noticed that no-one else started on the wheel first. Some tried their hand at the post, but most went for the collet first as it was going to be easy to do. Something to get out of the way. But I was worried that if I finished anything early, that would lead me to become a little complacent, so I decided to stick with the wheel.
The Star Wheel
Part 1 – Pre Planning
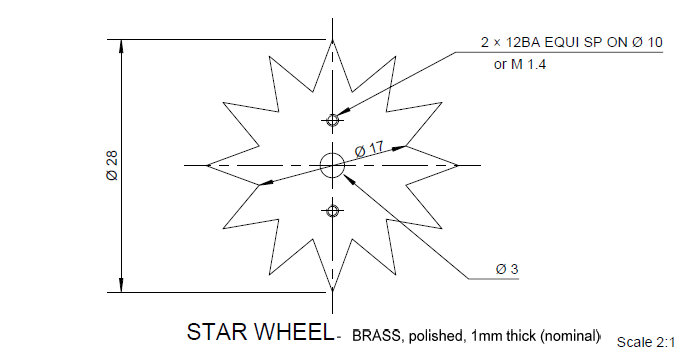
The star wheel has 12 points. A quick sum tells you that 360/12 is 30 degrees between each point. So we need to draw a circle of 14mm radius (taken from the given 28mm diameter), and then divide it into 12 equal parts 30 degrees apart.
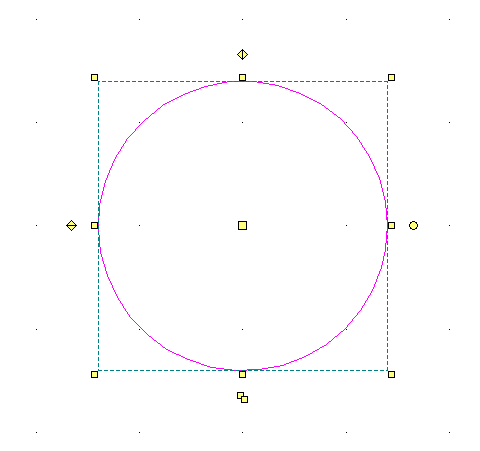
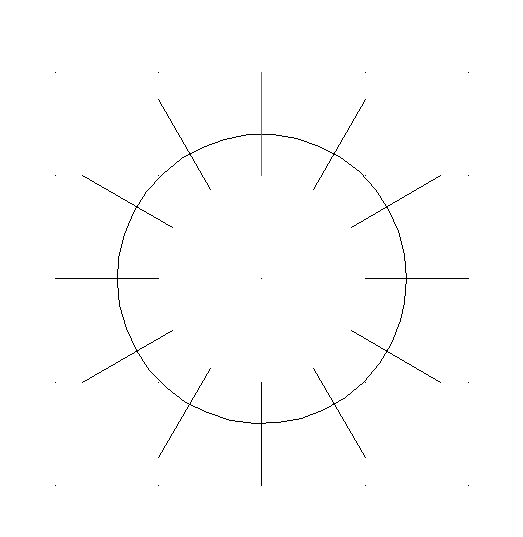
We can then draw another circle inside that of 8.5mm radius. In this inner circle we want a start point that is exactly in the middle of one of the outer points, so we need to advance 15 degrees from one of the outer points. Then from this start point we can split the inner circle into 12 parts, again each one 30 degrees apart.
Then we just need to join the dots and we have our star wheel. Simple eh?
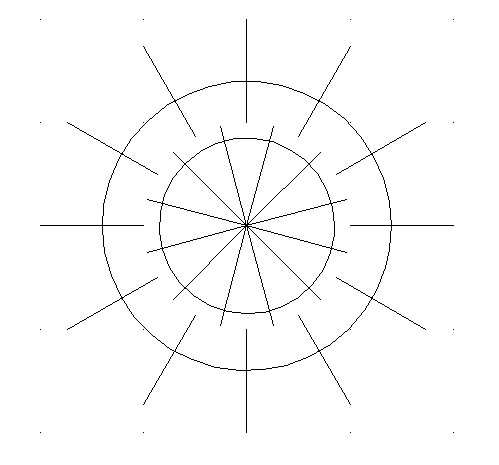
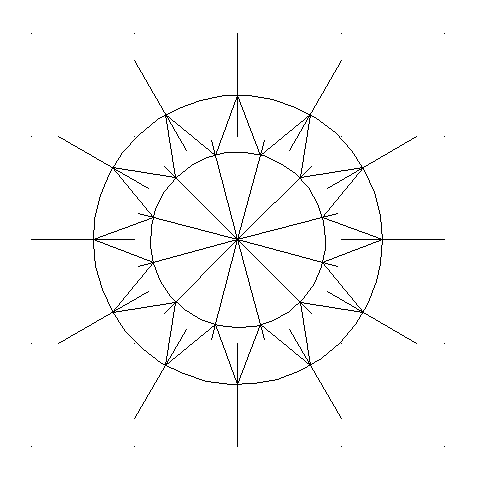
 There’re two other features of the star wheel. First is the hole in the middle of 1.5mm diameter, and second is the two smaller holes with a screw thread.
The hole in the centre is straightforward. This is where the collet is going to fit in. For the moment you’re just going to want to make a small hole, as you’ll be wanting to put in on a wax chuck. My wax chuck had a 1mm pip, and so I drilled a 0.9mm hole and broached it to be a tight fit.
The smaller holes are on a 5mm radius from the centre with a 12BA thread. It’s important to make sure that they line up with the outer points as shown in the main drawing.
The Star Wheel
Part 2 – Construction
 The first thing you need to do is mark out the star on your brass. For this I drew the star wheel on a CAD programme, and printed it out. You could draw it if you wanted, but I prefer CAD as you can easily duplicate it or amend it if needs be.
I decided to make 3 stars at once, sandwiching three sheets of brass together. The idea was that I would cut them all together, file them to size and then use the middle one. This is because however careful you might think you are, your hand will rock back and forth very slightly when filing a flat rounding the edges of whatever you’re filing.
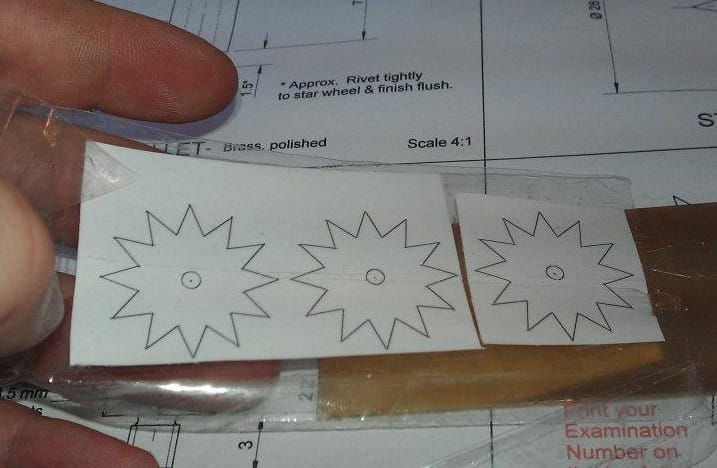
So the one in the middle should hopefully have a flat edge, whereas the two others would have a slight taper. It also had the added benefit of being a larger area to file, as it’s always easier to file a flat on a larger surface than a smaller one.
I thought about using shellac to adhere them together, but because I was going to work it on a lathe and shellac is thicker than glue, I used superglue instead. Shellac is a very romantic choice, as it’s such an ancient and natural material. However, it’s important to not get lost in the romance at the expense of practicality. I have no doubt that if Harrison, Graham or Breguet had access to modern superglue – they would have used it.
With the three sheets of brass glued together I stuck the CAD made drawing to one of the sides, again with superglue. Now I wanted to put the drawing on both sides, but was worried that I wouldn’t be able to line up the teeth on the drawings exactly. So I drilled two holes in my piece, both between the teeth and at a fixed distance. I could be sure that the holes were at 90 degrees, as I used a pillar drill. Then I just had to match up the drawing to the same holes on the other side.
I must admit I was a bit casual about this. I still had in my mind that this whole project was going to be impossible, and therefore had a “that’ll do” attitude. It turned out in the end that I was pretty bang on with matching up the sides. If I’d have been out then I would have ended up making the edges of the teeth sloped.
Ideally you should drill the all 3 main holes (centre hole plus 2 taped holes) at this point. I drilled the centre hole, but decided to leave the 2 smaller tapped holes until later, which was a bit of a dangerous move and one that I wouldn’t repeat if I did it again – simply because those teeth are very fragile once cut and you will need to clamp the wheel to drill into it. Clamping and fragile don’t really mix and doing any “heavy” work should always be done first if possible.
I didn’t want to work with the paper still on the pieces, as I’d tried this before on a practice piece, and the paper seemed to nudge a little when you were filing near it, so I decided to score the surface. I did this by using my scriber and basically pushing down on the tips and the troughs of the teeth on the drawing, making indentations in the brass.
Then I rubbed Essence of Renata on the paper, so that it would soak in and dissolve the glue. I was careful to not get it near the joins of the plates. I then rubbed the paper off and washed it all down with soap and water.
Once done I did that same as my CAD drawing and joined the dots I’d made in the brass with a ruler and scriber. I was careful to allow about an extra 0.1mm. In retrospect I should have left myself a bit more room for error and 0.15mm or even 0.2mm would have been better.
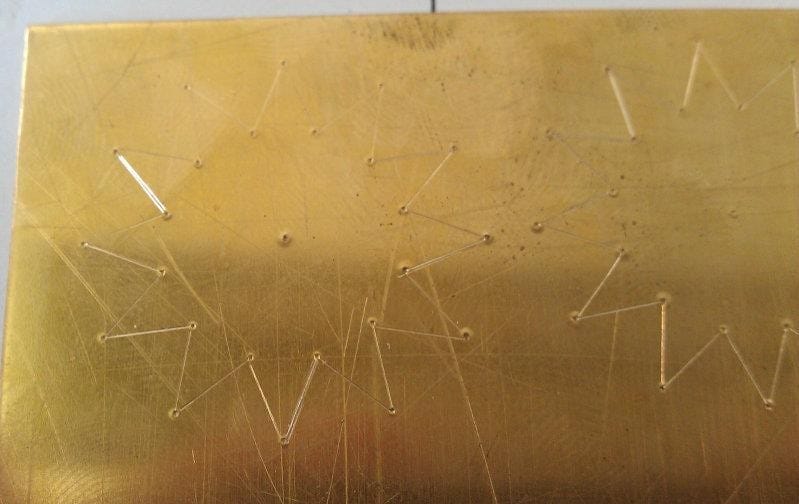
Next step was to get a piercing saw and make the piece as round as possible, within about 2-3mm of the outer edge of the teeth.
With that done I glued the rounded piece to my wax chuck, ensuring that the chuck was faced off in the lathe first. It’s very important that the pip and the hole you’ve drilled and tight fits, as otherwise you’re going to throw off your entire marking out.
When I was happy that the piece was secured I used a cross slide on a lathe with a general cutting tool to round off the piece. I got to about 0.2mm of the tolerance. Remember that that’s the radius. It’s very easy to measure something round and think you’re say 0.1mm out, but actually because you’re measuring the diameter you’re only 0.05mm out, because you’ve got 0.05mm at the top and 0.05mm at the bottom.
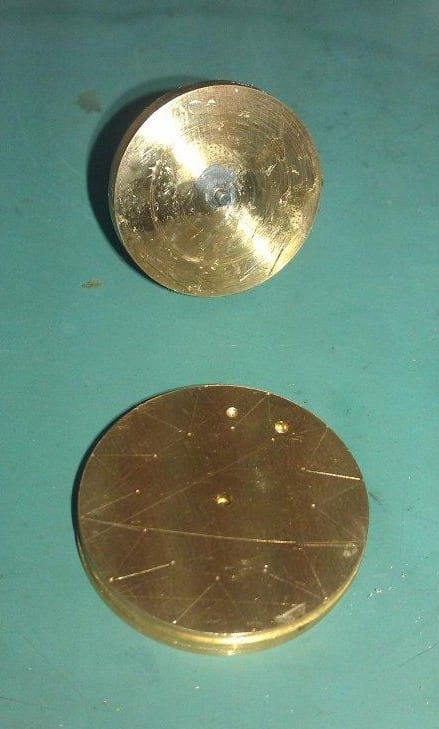
Then I had to get the piece off the chuck. But oops, I’ve glued it… and the plates are glued together too. So if I heat them or use Renata to dissolve the glue everything will all fall apart. No problem.
Remember those two holes I drilled earlier when aligning the paper CAD drawing? Well I had used a 1mm drill bit, and so when I heated the chuck and removed the plates, the plates as I suspected came apart too, so I cleaned any glue residue with Renata, and washed them with soap and water.
In those 1mm holes I then threaded my 1mm drill bit, and then threaded another 1mm bit at the bottom. I then added glue between the plates and then pushed them together. I clamped one side down in my vice (with some insulation tape on the vice teeth to avoid them marking), and then used another clamp on the other half. I was able to clamp about 95% of the surface of the plates, so I could be confident that they would glue flat, as you need to be careful when clamping something you’re gluing, as it will have a tendency to splay out when you add pressure on just one side.
So now my piece was together and round, I put it back in my vice and made a rough cut of the teeth with a piercing saw. Then I moved onto a file. I used a cut 4 Barret file. Brilliant for tight jobs such as this one. Those tips and bottoms of the teeth were going to be a nightmare – and there were 12 of each!
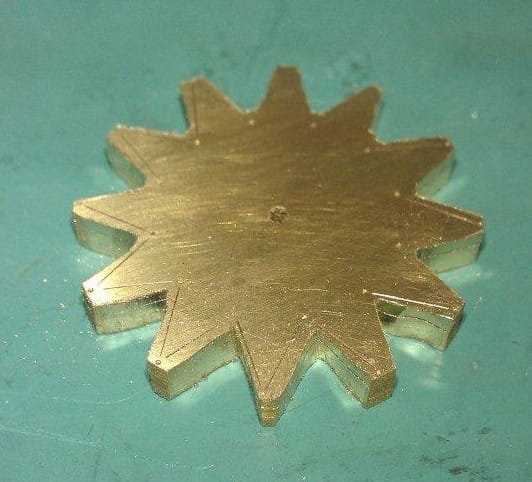
It was getting scary now. I could see myself getting closer and closer to the marked out edges of the teeth, and the slow realisation that very soon I was going to be getting to a point where I could ruin everything with a slip of the file.
I got to within about 0.2mm of the outside tolerance for the edges of the teeth, the same distance I’d got from the tips of the teeth when I’d rounded the piece off to on the lathe before. And then I stopped.
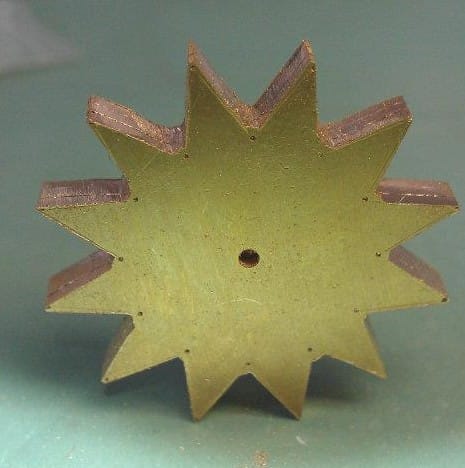
I had three partial stars now all stuck together. I was just too worried about not just messing up one of my stars, but messing all three up, and then having to go back to the beginning again. So I made the decision to split up the brass plates and work on just one star. It was not really what I had intended to do, but I just convinced myself that any potential rocking of my hand that I was trying to overcome could be bested with just being really, really careful. Also it meant that I had two back-up stars should anything go wrong.
Fear plays an important part in any exam. It can make you rush answers, forget everything you know and make rash decisions. In a practical exam it manifests itself in a different way. Paralysis.
You become so worried about making a mistake, you actually end up doing nothing.
For hours on end during the two week exam I would sit and stare. Pretending to myself that I was thinking or making a decision, whereas I was actually doing the opposite. I knew exactly what I needed to do, but just didn’t want to do it. Because by doing something I could fail, by doing nothing then nothing could go wrong and I was safe.
There’s some logic there, but it’s contradictory to an exam environment. Fear is one of the main reasons why it takes forever to do something the first time, but is much quicker and easier the second time. You could say it’s practice, but in the most part it’s the confidence you have and the realisation that there’s nothing to be afraid of.
Fear is something that’s primeval, and irrational. The majority of actors still get stage fright, and I’m sure the majority of watch/clock makers still get the jitters when they are making those final few strokes with a file.
I remember the story from the Tower of London that one of the Beefeaters relished in telling. It was that when the gem cutter came to make his first cut into the Star of India, one of the world’s biggest diamonds. Apparently the second he made the cut, he passed out. You could just imagine the fear that was pouring through his veins at the time – if I mess this up I cannot undo it.
Fortunately for him it worked and the diamond is now the centre piece of the Queen’s crown.
So fear is something that everyone has. It will not go away, and it cannot be reasoned with. You just have to suck it up.
So I sucked it up and moved on. I got the middle star wheel down 0.1mm on all edges – within tolerance. Then I decided to drill those two pesky tapped holes I hadn’t done earlier. The holes were drilled perfectly. The trouble was that when I clamped the wheel to hold it in place while I drilled, I tightened it too much, despite using reams of cushioning material on the teeth. And so now I had crushed the very tips of the teeth. Not by much, but enough that if this star wheel was ever to be used in a carriage clock as intended, it wouldn’t work.
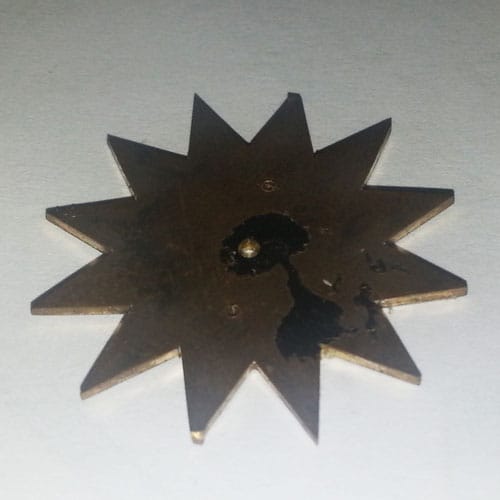
I felt sick.
My fear was well placed then. But fortunately, I had the confidence that I knew I could get it to a good standard and that helped me on my next attempt.
This time I decided to drill both of those two holes first, and did it for the two remaining star wheels at the same time.
Confident that I could do a good job I got stuck in. Trouble was, it just didn’t work out as well as the first one I’d just messed up.
You need to bear in mind that filing those 12 teeth, with their 24 sides, is not only incredibly tedious, but it takes hours. And I was in the middle of an exam that was tight on time.
I’d now made two wheels. The first had turned out great, but then I’d crushed some of the teeth. The second one was crushed teeth free, but didn’t look so great. I’d been a bit over zealous on some of the sides, and so the teeth weren’t all completely equal, some were in tolerance, but some weren’t.
I very almost said “that’ll do”. I was at the end of day 3 already, over 30 hours of work and had nothing to show for it. I said to myself, give it another go, if it works out – great, if not, then I’d just go back to my second attempt. It wasn’t that bad at the end of the day.
So I spent the entirety of day 4 making the star wheel from my final piece of brass. The tips of the teeth ended up making themselves just as a process of taking down the sides. I tried my best to file equally on either side and so that the tips were perpendicular to the face of the wheel. It was very easy to end up with teeth that were a bit wonky. I also was very aware that by removing material from the sides of the teeth, the tips of them would get smaller. And so as I got to within the allowed tollerance I purposely kept my file away from the edges near the tips. I reasoned that the function of the wheel was primarily based on the length of the teeth and their spacing, so I shouldn’t sacrifice this for the sake of getting an absolutely perfect finish on the teeth edges.
I got it down to within tolerance and then finished off the edges of the teeth. I did this by firstly going over the surfaces with a cut 6 file, then some emery paper; 600 grade then 1200 grade. I got a piece of brass, filed a sharp edge on it and then ran the brass along the edge of the tooth, burnishing it. I decided to not use Autosol or Brasso, as I reasoned that I’d only end up rounding the edges.
For the bottom of the teeth I took my beloved Barret file and ground down one of the sides so that it was razor sharp and more akin to a saw. Very carefully dragging the file along the bottom of the teeth allowed me to create an almost sharp inner edge. It looked good with the naked eye, but under a microscope it was still a little rounded.
This was where I reminded myself that the star wheel probably wouldn’t be half the marks, and so I really did say “that’ll do” but was happy with how it has turned out.
I tapped the two small holes at this point. I secured the tap into my vice and set it up so that it pointed perfectly to the sky, I used my engineers square for this. The tap only had to go through 1mm of material and so I held the wheel in my hand as I screwed the tap in, being careful to rotate the piece in my hand and constantly check from different viewpoints that the wheel was flat as I turned it. I used a little 3in1 oil to help with the tapping and removal of swarf.
The next step was to finish one of the sides. Making sure that I removed all of the scoring marks and getting it as close to a mirror finish as I could. I only needed to do one side at this stage, as I’d have to rivet the collet in still and so I’d only end up damaging that side in the process. So the finished side would be the side that the collet sat on.
This apparently simple task proved really tough. Brass wants to be scratched. I’m convinced. There must have been some brass gremlins lurking around somewhere
As soon as you breathe on brass, some microscopic dust will gouge out a huge trench in the surface of the piece. This is where it’s really important to work in a clean environment. Unfortunately I was in a workshop packed with other students flinging steel and brass particles in the air, so I just had to hope for the best.
What eventually worked was using 400 emery paper to get all the scratches out. Then 1200, and then 1600. I stuck the emery paper onto some Perspex so that it was as flat as I could make it, and rubbed the wheel against the Perspex rather than the other way around. I moved straight from this to Autosol for the final buffing.
The secret for me was actually to not spend much time on each grade of paper. All that tended to do was introduce new scratches.
I also tried diamond paste and lapping paper at points. But they didn’t seem to help a great deal with brass.
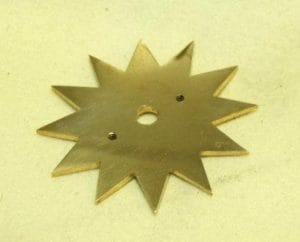
By this stage, halfway through day 5, I had decided to complete the rest of the work in the following order and allocated time to each part:
- Make Collet and finish (half a day)
- Rivet Collet to Wheel (half a day)
- Finish Riveted side of Wheel (half a day)
- Make Post (two days)
- Make Taper Pin and finish (half a day)
- Finish Post (one day)
So that would all add up to 9.5 days. Leaving me half a day to finish off any loose ends. It was tight, but doable. Now all I needed was the luck of the Gods that nothing would go wrong.
View the 2nd part of the post here>>>


Antony
19 February, 2013 at 6:17 pm
Fantastically informative and encouraging, thank you.
Colin
20 February, 2013 at 8:43 pm
Antony, thanks for your reply, I’m glad you found it useful.
Edward Gills
10 January, 2014 at 6:19 pm
I found this really helpful, thank you for documenting the troubles and pressures that occurred during the process